Authentication in passbolt
GPGAuth-based authentication
Passbolt’s API uses the GPGAuth protocol for authenticating the users. This page details the process.
Examples
For a practical implementation example, you can also have a look at the following:
What is GPGAuth?
GPGAuth is a protocol that uses OpenPGP keys to authenticate users. In short the server generate a challenge that must be decrypted and returned by the user. It also contains a challenge to verify the user server key. Challenge based authentication is different that form based authentication, you can learn more about the difference on this page.
Sequence diagram
The authentication process works by the two-way exchange of encrypted and signed tokens(nonces) between the user and the server. The authentication process is as follows:
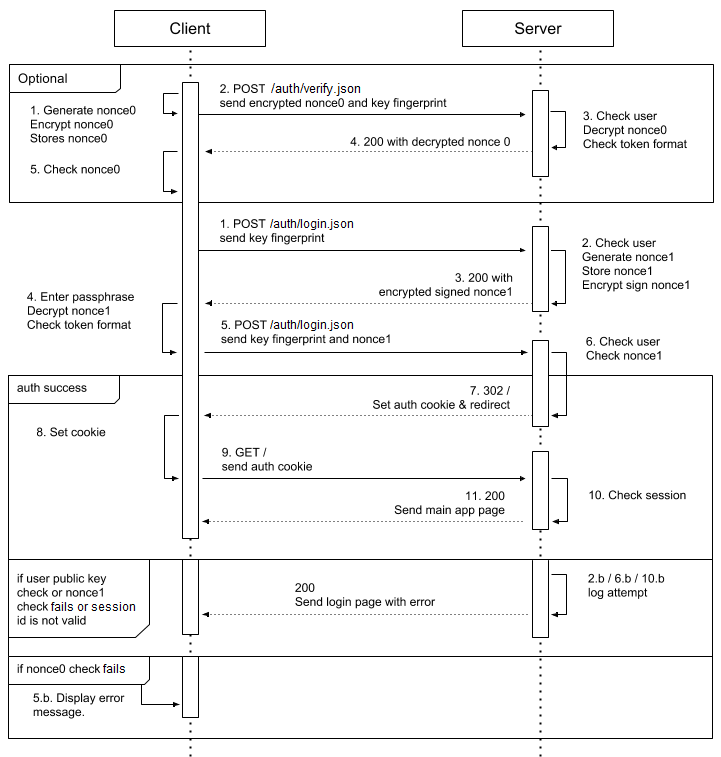 fig. Sequence diagram of a GPGAuth-based authentication
Custom response headers
The server uses a set of custom HTTP headers to send information to the client related to the authentication. It will be easier to understand their use in the steps that follow, but a brief description of some of them is provided here:
| Header | Description |
|---|---|
| X-GPGAuth-Verify-Response | The challenge response, e.g. the secret the server needed to decrypt. The client compares it with the one stored locally and confirms server’s identity. |
| X-GPGAuth-Progress | The current login stage number. Possible values are verify, stage0, stage1, complete and logout. |
| X-GPGAuth-User-Auth-Token | An encrypted token sent from the server for the client to decrypt in order to confirm its identity. |
| X-GPGAuth-Refer | URI of the last location which triggered the login process. Used to redirect back after a successful login. |
| X-GPGAuth-Error | Any information with regards to an authentication error |
| X-GPGAuth-Pubkey | The server public key url |
| X-GPGAuth-Logout-Url | The logout URL |
| X-GPGAuth-Version | GPGAuth version |
Authentication sequence details
Verify Step
The verify step is used to verify your passbolt server identity. It is useful in some security cases such as when a domain name is seized. This server identity verification should not be understood as an end-to-end server authentication, e.g. it does not protect against an attacker performing a man in the middle attack.
Though this step is optional, it is recommended for a client to verify the server key. It involves:
- The client generates a token(nonce) in a specific format. It must have the pattern of version, UUID length,
v4 UUID, and version (separated with pipes):
gpgauthv1.3.0|36|10e2074b-f610-42be-8525-100d4e68c481|gpgauthv1.3.0The client then encrypts the token with the server’s broadcasted public key and stores the unencrypted version of the token locally, for future use.
- The encrypted token is sent to the server along with the user key fingerprint.
Make a POST request to /auth/verify.json and send the token in the request body under gpg_auth[‘server_verify_token’]:
'data' => [ 'gpg_auth' => [ 'keyid' => <fingerprint_of_the_user>, 'server_verify_token' => <Encrypted_token> ] ] - Based on the user key fingerprint the server checks if the user exists and is active. If the fingerprint is verified, the server decrypts the token and checks if it is in the valid format.
- If in a valid format, the server sends back the decrypted token: in the response look for the
X-GPGAuth-Verify-Responseheader. - The client checks if the token matches the unencrypted one stored locally. If it does not match the client warns the user that the server identity cannot be verified.
- The client proceeds to the login step only if the local unencrypted token matches the server’s decrypted token.
Login Step
Steps Overview
- The client sends the user key fingerprint to the server.
- The server checks to see if the fingerprint is valid and if the user associated with it is active. It then generates a token of random data, stores an unencrypted version locally, and then creates an encrypted version of the token as well.
- The server sends the encrypted token to the client.
- The client prompts the user to enter their private key passphrase, the client decrypts the encrypted server token and checks the token format.
- The client sends back the decrypted token along with the user key fingerprint again.
- The server compares the decrypted token sent from the client to make sure it matches its locally stored unencrypted token from step 2. If the server is satisfied, the authentication is completed as with a normal form-based login: a session is started.
Step 1 detail
To get your GPG key fingerprint, you can use the gpg --fingerprint command. It will output a list of fingerprint the
current user has access to.
$ gpg --fingerprint
/home/ada/.gnupg/pubring.kbx
-----------------------------
pub   rsa4096 2015-10-26 [SC] [expires: 2019-10-26]
      03F6 0E95 8F4C B297 23AC  DF76 1353 B5B1 5D9B 054F
uid           [ unknown] Ada Lovelace <[email protected]>
sub   rsa4096 2015-10-26 [E] [expires: 2019-10-26]
It is also possible to retrieve your fingerprint via the passbolt app. Once logged in, navigate to your user’s Profile, and select Keys Inspector (URL path: /app/settings/keys).
The client sends the fingerprint of the user’s key via a POST request.
POST /auth/login.json
'data' => [
    'gpg_auth' => [
        'keyid' => <fingerprint_of_the_user>
    ]
]
Step 2 detail
Step 2a: A matching key is found on the server, and the user is active. The server then generates a random token, stores it locally and then encrypts it with the user’s public key.
Step 2b: A matching key is not found, or one is found but it belongs to an inactive user. The server returns a
HTTP 404 NOT FOUND response meaning the user with the given fingerprint is not granted access to your passbolt server.
Step 3 detail
The encrypted token is then sent in the
X-GPGAuth-User-Auth-Token header to the client. An example response looks like this.
X-GPGAuth-Authenticated: false
X-GPGAuth-Login-URL: /auth/login
X-GPGAuth-Logout-URL: /auth/logout
X-GPGAuth-Progress: stage1
X-GPGAuth-Pubkey-URL: /auth/verify.json
X-GPGAuth-User-Auth-Token: -----BEGIN\+PGP\+MESSAGE-----
X-GPGAuth-Verify-URL: /auth/verify
X-GPGAuth-Version: 1.3.0
Step 4 detail
The client asks the user the private key passphrase. Then with the private key, the client decrypts the token given by the server and verifies its format.
Step 5 detail
The token is returned encoded as a url. To be used, it first needs to be decoded.
Decode token with PHP
If you have php installed, you can use this command:
echo "<token>" | php -r "echo stripslashes(urldecode(file_get_contents('php://stdin')));"
Decode token using a browser console
Alternatively, you could use the console of your browser with Javascript to decode the key:
var uri = "-----BEGIN\+PGP\+MESSAGE----- ..."
decodeURIComponent(uri)
Using this browser console approach will still leave plus(+) signs in the header and footer which must be replaced with spaces.
Decrypt token
Now that the token has been decoded, the client then decrypts the encrypted token:
echo "<encrypted_token_from_server>" | gpg -d
The user’s private key passphrase will be required for decryption while also serving to verify the ownership of the fingerprint sent in step 1.
The client must verify the token for proper format. Otherwise, there is a risk than an attacker uses this channel to decrypt other content. The token format must look like:
gpgauthv1.3.0|36|10e2074b-f610-42be-8525-100d4e68c481|gpgauthv1.3.0
After decrypting, the client will send the decrypted (plaintext) data back to the server for verification.
POST /auth/login.json
'data' => [
    'gpg_auth' => [
        'keyid' => <same_fingerprint_as_step1>,
        'user_token_result' => <decrypted_token_in_plaintext>
    ]
]
Step 6 detail
Finally, the server verifies the plaintext token against the one stored locally in step 2 and upon success:
- Initiates a session
- Logs the user in
- Generates a secure token and sends to the client as a cookie called “csrfToken”
Working with CSRF token
To prevent Cross Site Request Forgery (“CSRF attacks”) a CSRF token must be included in all future requests that affect the integrity of the data (e.g. a resource edit, a user delete action). This makes sure that an attacker cannot create a malicious website that would trigger an action in passbolt (e.g. preventing “clickjacking”).
Working with MFA
Passbolt Pro Edition currently supports logging in using multi factor authentication (MFA). Your script will need to
cater for these scenarios if the account you are using has MFA enabled. After login, or when the current MFA
authorization session expires, if MFA is required the current request will be redirected using the HTTP 403 FORBIDDEN
code.
{
  "header": {
    "id": "b90fc548-236c-4e69-a6f6-27137e3acd0f",
    "status": "error",
    "servertime": 1555513784,
    "action": "af9aa2c6-7355-514d-a4a0-3e74de4c0fdb",
    "message": "MFA authentication is required.",
    "url": "/mfa/verify/error.json",
    "code": 403
  },
  "body": {
    "providers": {
      "totp": "https://my.passbolt.io/mfa/verify/totp.json"
    }
  }
}
The response lists the available options. It is possible to redirect the user there or for some providers, such as TOTP (Google Authenticator) or HOTP (Yubikey), to implement this logic directly inside your application with additional interactions.
For example you can post the MFA credentials for TOTP provider as follow:
fetch('/mfa/verify/totp.json', {
  method: 'POST',
  headers: {
    'Content-Type': 'application/json; charset=utf-8',
    'X-CSRF-Token': crsfToken
  },
  body: {'totp': otp}
});
For some other providers like Duo, it requires you to have the ability to embed an iframe.
Last updated
This article was last updated on January 8th, 2021.You can also find the latest OpenAPI 2.0 specifications directly on the dedicated repository.
OpenAPI Specs repository