How to extend a user expired key
While setting up an account on passbolt, you can let the wizard generate OpenPGP keys for you or upload ones generated on your computer.
Passbolt wizard OpenPGP keys has no expiration date. In case you generated OpenPGP keys with an expiry date, you won’t be able to authenticate to passbolt once the expiry date passed.
We will explain in this FAQ page how to extend your passbolt OpenPGP key if you are in this case.
Remove expiration date of your passbolt private OpenPGP key
Import your private expired key:
gpg --import private.asc
As you can see, this key has an expiration date:
pub   ed25519 2022-01-21 [SC] [expires: 2024-01-21]
      B35F66C2B587EC54DB71A547C9FDEB2DC5EB9F9C
uid                      John Doe <[email protected]>
sub   cv25519 2022-01-21 [E] [expires: 2024-01-21]
Edit the key by selecting its fingerprint
gpg --edit-key B35F66C2B587EC54DB71A547C9FDEB2DC5EB9F9C
You will get the below output:
gpg (GnuPG) 2.3.4; Copyright (C) 2021 Free Software Foundation, Inc.
This is free software: you are free to change and redistribute it.
There is NO WARRANTY, to the extent permitted by law.

Secret key is available.

sec  ed25519/C9FDEB2DC5EB9F9C
     created: 2022-01-21  expires: 2024-01-21  usage: SC
     trust: ultimate      validity: ultimate
ssb  cv25519/54A4FF74028F12AF
     created: 2022-01-21  expires: 2024-01-21  usage: E
[ultimate] (1). John Doe <[email protected]>
Where:
- sec is the SECret key
- ssb is the Secret SuBkey
Disable the expiration date for the secret key with the expire command:
gpg> expire
Changing expiration time for the primary key.
Please specify how long the key should be valid.
         0 = key does not expire
      <n>  = key expires in n days
      <n>w = key expires in n weeks
      <n>m = key expires in n months
      <n>y = key expires in n years
Key is valid for? (0) 0
Key does not expire at all
Is this correct? (y/N) y

sec  ed25519/C9FDEB2DC5EB9F9C
     created: 2022-01-21  expires: never       usage: SC
     trust: ultimate      validity: ultimate
ssb  cv25519/54A4FF74028F12AF
     created: 2022-01-21  expires: 2024-01-21  usage: E
[ultimate] (1). John Doe <[email protected]>
As you can see, the expires is now never for secret key but remains 2024-01-21 for the secret subkey.
Select the subkey with the key 1 command (you will see an asterisk next to it):
gpg> key 1

sec  ed25519/C9FDEB2DC5EB9F9C
     created: 2022-01-21  expires: never       usage: SC
     trust: ultimate      validity: ultimate
ssb* cv25519/54A4FF74028F12AF
     created: 2022-01-21  expires: 2024-01-21  usage: E
[ultimate] (1). John Doe <[email protected]>
Execute again the expire command:
gpg> expire
Changing expiration time for a subkey.
Please specify how long the key should be valid.
         0 = key does not expire
      <n>  = key expires in n days
      <n>w = key expires in n weeks
      <n>m = key expires in n months
      <n>y = key expires in n years
Key is valid for? (0) 0
Key does not expire at all
Is this correct? (y/N) y

sec  ed25519/C9FDEB2DC5EB9F9C
     created: 2022-01-21  expires: never       usage: SC
     trust: ultimate      validity: ultimate
ssb* cv25519/54A4FF74028F12AF
     created: 2022-01-21  expires: never       usage: E
[ultimate] (1). John Doe <[email protected]>
Once done, execute the save command to save your changes:
gpg> save
Export your new extended key and save it in a safe place:
gpg --armor --export B35F66C2B587EC54DB71A547C9FDEB2DC5EB9F9C > public.asc
gpg --armor --export-secret-keys B35F66C2B587EC54DB71A547C9FDEB2DC5EB9F9C > private.asc
Update the key in passbolt
Passbolt server side, you need to update public key in gpgkeys table of passbolt database and delete it from the passbolt keyring.
Database update
First identify your user ID. Replace [email protected] with email of your user:
SELECT id, username FROM users WHERE username = [email protected];
The returned ID should be something like 02aa768a-df59-4247-ab52-328373880016
Confirm now you have one unique row for the below request (replace 02aa768a-df59-4247-ab52-328373880016 with ID of your user, \G is to display results vertically)
SELECT * FROM gpgkeys WHERE user_id = '02aa768a-df59-4247-ab52-328373880016' \G
If you got exactly one row, you can replace the current public OpenPGP key with the new one (replace user_id with your user’s ID and put your new OpenPGP public key as armored_key):
UPDATE gpgkeys SET armored_key = "-----BEGIN PGP PUBLIC KEY BLOCK-----

mQGNBGHSrQEBDADES5YK8aSSg7sIWF/GvilOYBhjYzpz1Q+mbtxZI1oZHwT0z4H5
a/tDu821EdSkrmrK1j+VUqlZr4n0wjf5NMKITvU6UioBP6QeYgtriCKZ5DOk1VOi
(....)
-----END PGP PUBLIC KEY BLOCK-----", modified = now(), expires = now() WHERE user_id = "02aa768a-df59-4247-ab52-328373880016";
Update the expires value of the old key with NULL (replace 02aa768a-df59-4247-ab52-328373880016 with ID of your user):
UPDATE gpgkeys SET expires = NULL WHERE user_id = "02aa768a-df59-4247-ab52-328373880016";
You can quit MySQL console.
Passbolt GPG keyring update
Check path of your GPG keyring from the healthcheck page of passbolt: https://url-of-your-passbolt/healthcheck, you should see /var/lib/passbolt/.gnupg/ but it can be different depending on your setup:
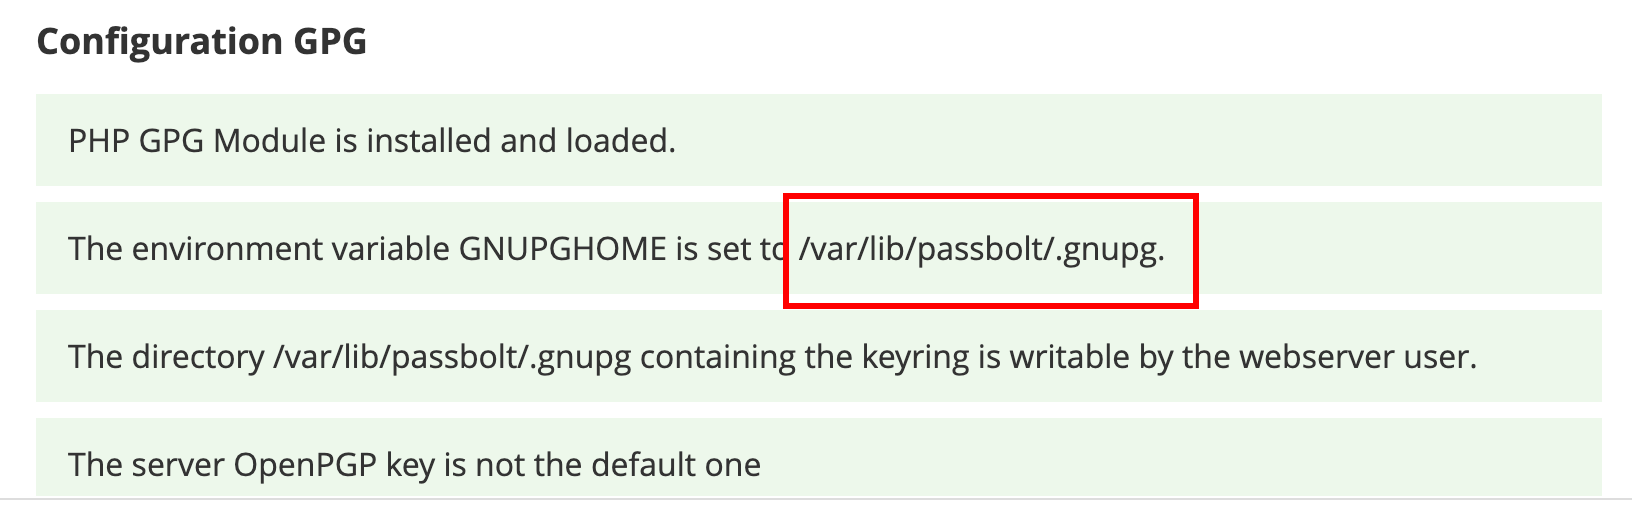 fig. passbolt healthcheck
You have now to remove the old OpenPGP public key from passbolt keyring. Connect as www-data user if you are using Debian or Ubuntu, or nginx if you are using CentOS:
sudo su -s /bin/bash www-data
List keys and find the one you want to delete (replace /var/lib/passbolt/.gnupg with your own).
gpg --homedir /var/lib/passbolt/.gnupg --list-keys
Once ID of the key found, delete it (replace /var/lib/passbolt/.gnupg with your own and 444F0E2FDD421119F69368E23F1C70EE1C10B10F with the ID of the key you want to delete):
gpg --homedir /var/lib/passbolt/.gnupg --delete-key 444F0E2FDD421119F69368E23F1C70EE1C10B10F
Recover your account
Step 1. In order to recover you will need to go to your domain URL and add /recover at the end of the url,
for example https://yourpassbolt.com/recover.
Step 2. Complete the form by providing your email address.
Step 3. Follow the link in your mailbox.
Step 4. Follow the recovery steps, which is much like the initial setup. You will need to import your private key.
Step 5. Enter your passphrase to login!
Other frequently asked questions in the same category
- How can I report a security vulnerability?
- What data is encrypted in passbolt?
- What kind of encryption does passbolt use?
- How does authentication work in passbolt?
- Is javascript cryptographically secure?
- Is open source software less secure?
- Does passbolt support revocation certificates?
- How are public keys trusted?
- What is the security token?
- How can I change my passphrase?
- My secret key and passphrase are compromised, what do I do?
- How to extend a user expired key
- Is it secure to use passbolt?
- Has the code been reviewed?